Ultra Short Throw (UST) projectors have revolutionized home entertainment by projecting large, vibrant images from a remarkably short distance, making them perfect for compact living spaces.
For enthusiasts looking to optimize their viewing experience, building a custom cabinet offers the dual benefits of enhanced projector performance and seamless integration with home decor. A personalized cabinet not only provides a stable, dedicated platform for your projector but also accommodates necessary ventilation and cable management, ensuring longevity and aesthetic appeal.
Engaging in this DIY project is not only cost-effective but also deeply rewarding, allowing you to tailor the design to your specific needs and style. This guide will walk you through the steps to create your own UST projector cabinet. Let's get started!
Overview UST Projector Cabinet
Before diving into the construction process, it's essential to have a clear understanding of what an UST projector cabinet is and why it's necessary.
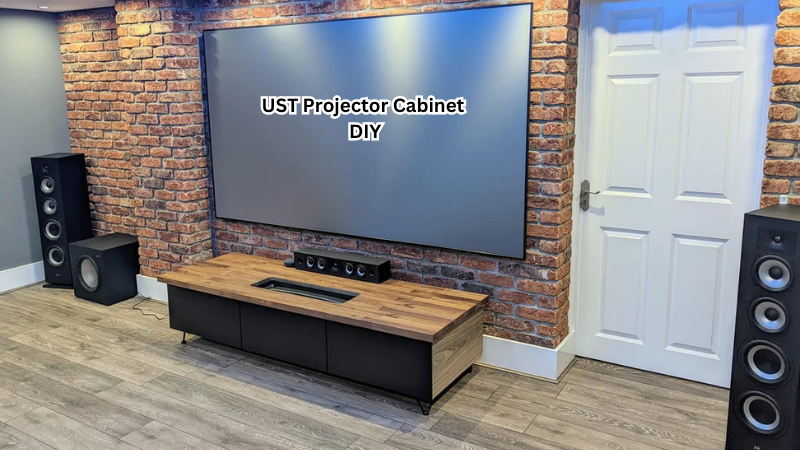
An UST projector cabinet is essentially a custom-built enclosure that houses your ultra-short throw projector, providing optimal conditions for its functioning. The cabinet also serves to conceal unsightly cables and wires, giving your entertainment setup a clean and polished look.
Furthermore, by eliminating external light sources from interfering with the projected image, a well-constructed cabinet enhances image quality and ensures an immersive viewing experience.
Benefits of Building a UST Projector Cabinet
Building your own UST projector cabinet offers several advantages, including:
- Personalization: With a DIY cabinet, you have complete control over the design and materials used, allowing you to create a customized piece that suits your style and needs.
- Cost-effective: By building your own cabinet, you can save money compared to purchasing a pre-made one or hiring a professional for the job.
- Improved performance: A well-designed cabinet can significantly improve the performance of your UST projector by providing proper ventilation and reducing ambient light interference.
- Seamless integration: Integrating an UST projector into an existing entertainment setup can be challenging. However, with a custom-built cabinet, you can seamlessly blend it in with your decor.
- Longevity: A sturdy and well-built cabinet can protect your projector from accidental damage, ensuring its longevity.
UST Projector Cabinet DIY
Now that you have decided to build your own UST projector cabinet, let's delve into the details of this exciting project.
Materials and Tools
To begin with, gather the necessary materials and tools for this project. These may vary depending on your specific design, but here are some general items you will need:
- ¾ inch thick MDF or plywood sheets
- Wood glue
- Brad nails or screws
- Table saw or circular saw
- Jigsaw (for cutting any intricate designs)
- Drill and drill bits
- Sandpaper (various grits)
- Wood filler (optional)
- Primer and paint/stain of choice
- Measuring tape and ruler
- Level
- Pencil or marker
It is highly recommended to have all the materials ready before starting the project to avoid any delays. You can also add other materials such as hardware for handles or hinges, LED lighting, or acoustic panels based on your design preferences.
Designing Your Cabinet
Next comes the fun part - designing your cabinet! Consider the size of your projector and available wall space when determining the dimensions of your cabinet. Keep in mind that UST projectors require a bit more depth compared to traditional projectors, so make sure to leave enough space for proper ventilation.
When it comes to aesthetics, you can opt for a simple rectangular box design or get creative with different shapes and patterns. This is where having a jigsaw comes in handy for cutting out any intricate designs on the cabinet panels.
Another important aspect to consider is cable management. Plan out where you want to place your projector, media players, and other devices, and design accordingly so that cables can be neatly hidden within the cabinet.
Building Your Cabinet
Once you have finalized your design, it's time to start building! Here are the general steps to follow:
- Cut the sheets of MDF/plywood according to your dimensions using a table saw or circular saw.
- Assemble the sides, top, bottom, and back panels using wood glue and brad nails or screws. Use a level to ensure that the cabinet is square and straight.
- If you have any intricate designs on the front panel, use a jigsaw to cut them out before attaching it to the rest of the cabinet.
- Cut out holes for cable management using a drill and appropriate sized drill bits.
- For better ventilation, consider adding holes or vents on the back panel as well.
- Sand down any rough edges or imperfections on the cabinet with sandpaper.
- If desired, fill in any gaps or nail/screw holes with wood filler and let it dry before sanding again for a smooth finish.
- Prime your cabinet using a suitable primer and let it dry completely.
- Apply a coat of paint or stain of your choice and let it dry before applying another coat for a more even finish.
- Install any additional hardware, such as handles or hinges, at this stage.
Setting Up Your Cabinet
Once your cabinet is built and painted, it's time to set up your projector and other devices. Follow these steps for a successful setup:
- Place the cabinet in its designated spot on the wall, making sure it is level.
- Attach any LED lighting strips inside the cabinet if desired.
- Carefully place your UST projector into its designated space, ensuring that there is enough clearance for ventilation.
- Connect all necessary cables and secure them within the cable holes for a clean look.
- Test your projector and other devices to make sure everything is working properly.
Congratulations, you have successfully built and set up your own UST projector cabinet!
Additional Tips
- To avoid any damage to your projector or cabinet, make sure to leave enough space for ventilation and do not obstruct the air vents.
- Consider adding acoustic panels inside the cabinet to improve sound quality.
- If using wood filler, make sure to sand it down thoroughly before painting for a smooth finish.
- For added protection, consider adding a lock or latch to secure your cabinet from curious fingers or accidental openings.
Maintenance Tips
Maintenance of your UST projector cabinet is crucial to ensure its longevity and proper functioning. Here are some tips to keep in mind:
- Dust the cabinet regularly, especially around the projector area, to prevent dust build-up that can affect performance.
- Keep an eye on the cable connections and make sure they are secure to avoid any disruptions during use.
- Check for any signs of wear or damage and fix them promptly to avoid further issues.
- If using a painted finish, touch up any chips or scratches as needed to maintain the aesthetic appeal of your cabinet.
By following these maintenance tips and taking care of your custom-built UST projector cabinet, you can continue enjoying high-quality entertainment for years to come.
FAQs
Are UST projector cabinets difficult to build?
Not necessarily. With the right tools and materials, building a UST projector cabinet can be a fun and rewarding DIY project. However, it does require some basic carpentry skills and attention to detail.
Can I customize the design of my UST projector cabinet?
Absolutely! You have complete creative control over the design of your custom-built cabinet, from size and shape to color and finish. Just make sure to consider the necessary dimensions for proper ventilation and cable management.
How long will my UST projector cabinet last?
With proper maintenance and care, your UST projector cabinet can last for many years. It also depends on the quality of materials used in its construction. So, make sure to use high-quality materials and follow maintenance tips for optimum lifespan.
Conclusion
Completing a DIY cabinet for your Ultra Short Throw (UST) projector offers numerous advantages, from boosting projector performance to enhancing room aesthetics and organization.
Crafting your own cabinet is not only cost-effective but also provides immense satisfaction as you tailor each aspect to fit your personal style and requirements.
A custom-made cabinet ensures your projector has the necessary ventilation and protection, potentially extending its lifespan. This project empowers you to create a space that reflects your unique taste while optimizing your viewing experience. Embrace the challenge and enjoy the rewarding journey of building your own UST projector cabinet, elevating both your home theater setup and your DIY skills.

